You will notice that there are really two things going on here. The first is
the "Object" tag and associated "Param" tags. These are
included to support Internet Explorer and other browsers that support ActiveX
controls. The second is the "Embed" tag. This is included to support
browsers that utilize the standard Netscape plugin architecture. In order for
your embedded player support the range of browsers available you need to include
both. Also, both tags should include the same set of information. For instance,
if you are going to change the height of the plugin you should change it in
both the "Object" tag and in the "Embed" tag.
There are quite a few tags that you may utilize when you use a QuickTime embedded player.
A full list is available from Apple by following the For more information: QuickTime Embed Tag Attributes.
Some of the more interesting ones are: AUTOPLAY, CONTROLLER and HIDDEN.
If I wanted to make sure the movie plays as soon as it is able, I would set
the AUTOPLAY to true.
If I didn't want a controller to be available
on the page I would set CONTROLLER to false (better make sure that AUTOPLAY
is true in this case). When you have a controller you should increase
the size of the movie by 17 pixels in height.
Also, as with QuickTime there are two sets of tags, the "Object" and "Param"
tags for IE and the "Embed" tag for Netscape compatible browsers.
You will notice that this version doesn't have any controls. The means for adding
controls to the Embedded RealPlayer is a bit more complicated than with QuickTime but also more flexible.
There are a whole slew of options and controls available (See the links below
for examples). Unfortunately to add controls to a RealPlayer you need to create another set of "Object" and "Embed" tags specific to the controls (along with the first set which define the video window).
Here is the second set of tags enabling all of the controls:
Many sites that offer streaming media on the internet utilize an embedded player
in a pop-up window. Here is a quick line of JavaScript that you can use to create
your own pop-up window:
<a href="javascript: var thewin=window.open("realembedded_all.html", someWindow,
'toolbar=1,scrollbars=0,location=0,statusbar=0,menubar=0,resizable=1,width=400,height=400');">Pop-Up</a>
Embedded QuickTime and JavaScript
Unfortunately, things are not well in the JavaScript and Plugin arena. Many browsers handle plugins differently and some don't expose them to scripting at all.
This means that in order to control a plugin from JavaScript you have to include different code for different browsers.
In any case, if you are interested in trying, checkout the following pages: QuickTime
Javascript Support Javascript
Support for Active X, Netscape 6 and Mozilla
SMIL - Synchronized Multimedia Integration Language
SMIL is an XML based markup language for creating streaming presentations that
integrate several elements such as a slide show with audio or two simultaneous videos. I
t offers some fairly powerful layout capabilities as well as synchronization and other
time based elements. SMIL is a standard endorsed by the W3C and exists in a variety of players
including both QuickTime and Real (with some support in Flash and Windows Media).
The Basics
Below is a the basic structure of a SMIL file.
Saving as a QT Movie
The first eight characters of the file must be "SMILtext" in order for QuickTime to successfully import a
SMIL file and turn it into a movie file. Previous to name change Following name change
QT Text Tracks
While you can include plain text in QT SMIL presentations you can't do much about how that text looks. In order to have more control over how and when the text is displayed you should use a QuickTime Text Track.
The easiest way to create a QT Text file is to create a plain text document in your favorite text editor and then to import it into QuickTime Pro. You then export it using the Export command and choosing "Text to Text". At this point you can edit the descriptors to change the font, color, timing and more. See below for a link to Apple's list of descriptors.
Here is the content of a text file that I created:
Hi My Name is Shawn
This Class is called Producing Participatory Media
It is a **FUN** class!!! ;-)
{QTtext}{font:Geneva}{plain}{size:12}{textColor: 65535, 65535, 65535}{backColor: 0, 0, 0}{justify:center}{timeScale:600}{width:160}{height:48}{timeStamps:absolute}{language:0}{textEncoding:0}
[00:00:00.000]
{textBox: 0, 0, 50, 160}Hi My Name is Shawn
[00:00:02.000]
{textBox: 0, 0, 50, 160}This Class is called Producing Participatory Media
[00:00:04.000]
{textBox: 0, 0, 50, 160}It is a **FUN** class!!! ;-)
[00:00:06.000]
Of course, you don't need to use QT Pro to create a file such as this, you can simply follow the same format and create this file in any text editor.
Here is the modified version that I created:
{QTtext}{font:New York}{Bold}{size:14}{textColor: 0, 65535, 65535}{backColor: 0, 65535, 0}{justify:center}{timeScale:600}{width:300}{height:120}{timeStamps:absolute}{language:0}{textEncoding:0}[00:00:00.000]{textBox: 0, 0, 50, 160}Hi My Name is Shawn[00:00:01.000]
{textBox: 0, 0, 50, 160}This Class is called Producing Participatory Media
[00:00:02.000]
{textBox: 0, 0, 50, 160}It is a **FUN** class!!! ;-)
[00:00:03.000]
Putting it all together
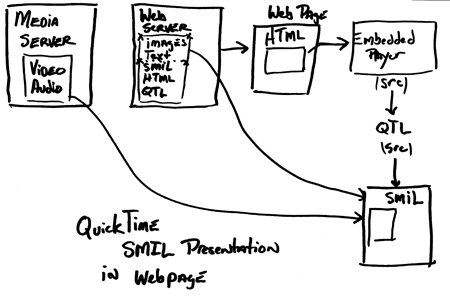
As illustrated in the above diagram, SMIL which contains pointers to media
(audio, video, text, images) should be uploaded to your webserver along with
your images and video and further more can be embedded just like a QuickTime
movie or a RealMedia document into a webpage. You use the same embedded player
HTML code as described above for putting a movie in your page. Instead of creating
a link directly to a movie (possibly using a QTML or RAM file) you create a
link to your SMIL document (also possibly using a QTML or RAM file for compatibility
purposes).
Extra Credit: Skins
Both QuickTime and Real allow the skinning of their players. While we aren't
going to go over how to do it in class it might be something that you are interested
in.
RealOne Skins
RealOne Skins are more for the hobbyest and aren't automatically instantiated
as a presentation. In this way they are more decoratative and less about adding
functionality to a player's interface. RealOne
Skins Toolkit Creating Custom
Skins For RealOne